The ‘Spring Awakening’ RV de-winterization process is one of the most important things you can do before hitting the road this season, and if you skipped any steps last fall, you could be starting from a much worse place than you think. RV batteries can discharge by as much as 10% per month while in storage, which means a rig stored since October could be sitting on a near-dead battery before you even open the door.
Key Takeaways
| Question | Quick Answer |
|---|---|
| What does spring RV de-winterization involve? | Flushing the water system, inspecting seals, checking tires and batteries, and reviewing all mechanical systems before your first trip. |
| When should I de-winterize my RV? | Start the process 2 to 4 weeks before your first planned outing so you have time to address any issues found during inspection. |
| Can winter damage require professional RV repair? | Yes. Fiberglass cracks, seal failures, and exterior body damage from ice or wind storms often need an experienced RV repair center. |
| What is PDR and does it apply to RVs? | Paintless Dent Repair (PDR) is a technique to remove minor dents without repainting. It can work on some RV panels depending on material and damage depth. |
| Do I need an auto body shop for winter RV damage? | For dents, scratches, paint damage, or structural issues, a qualified auto body shop with RV experience is the right call. |
| What systems do I flush during de-winterization? | The fresh water tank, water lines, hot water heater, and all faucets need to be flushed to remove antifreeze and any stagnant water. |
| Should I inspect the roof during spring de-winterization? | Absolutely. The roof is the most vulnerable area for seal deterioration, moisture intrusion, and storm damage over winter months. |
What Is the ‘Spring Awakening’ RV De-Winterization Process?
The ‘Spring Awakening’ RV de-winterization process is a systematic inspection and recommissioning of all your RV’s systems after a period of winter storage. It is not just about pulling off a cover and topping up the tank.
A thorough de-winterization addresses your water system, electrical setup, tires, roof seals, exterior body condition, and mechanical components. Skipping any of these areas creates real safety risks and can result in expensive repairs down the road.
In 2026, with more families hitting the road earlier in the season due to expanded campground openings and warmer spring temperatures across much of the country, getting your rig ready correctly is more important than ever. A rushed de-winterization is one of the leading causes of breakdowns on the first trip of the year.
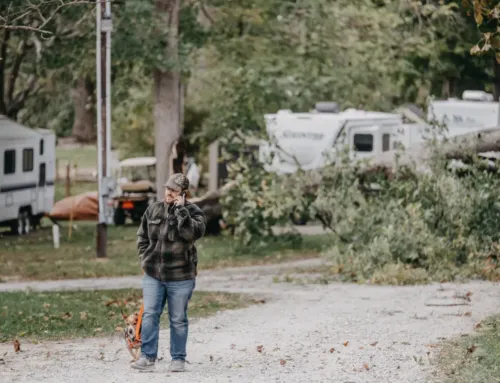
Step 1: Inspect Your RV Exterior After Winter Storage
Start every spring RV de-winterization from the outside. Walk the full perimeter of your RV and note every scratch, dent, crack, or area where sealant has lifted or deteriorated.
Pay particular attention to:
-
Roof seams and seals around vents, skylights, and AC units
-
Slide-out seals that may have dried out or cracked in cold temperatures
-
Fiberglass panels for hairline cracks, oxidation, or impact damage from winter storms
-
Awning fabric and hardware for tears, mold, or bent components
-
Entry door seals and window gaskets
Wind events and ice loading during winter can cause body damage that looks minor but hides deeper structural issues. If you spot significant exterior damage, do not attempt a DIY fix on fiberglass, painted panels, or structural components.
This is where a visit to a qualified RV repair center becomes essential. A professional technician can assess damage that the untrained eye misses entirely.
Step 2: Flush Your Water System Completely
If you winterized your RV with antifreeze (the standard approach), your water system needs a full flush before use. This is one of the most critical steps in the spring RV de-winterization checklist.
Here is the process we recommend:
-
Install a fresh water filter if you removed one for storage
-
Fill the fresh water tank with clean water
-
Open all faucets (hot and cold) and run water until antifreeze is completely cleared
-
Flush the toilet multiple times
-
Run the water heater on bypass until all antifreeze is purged, then return it to normal operation
-
Check all under-sink connections, the water pump, and water heater connections for leaks
-
Run sanitizing solution through the system and flush again
Do not skip the water heater inspection. A cracked anode rod or a failed pressure relief valve can cause serious damage (or injury) once the system is pressurized and heated.
A clear 5-step guide to de-winterizing your RV this spring. Learn essential checks from seals to water systems to hit the road confidently.
Step 3: Tire, Battery, and Mechanical Checks for Spring
Tires and batteries are the two systems most affected by winter storage, and both deserve close attention during your ‘Spring Awakening’ RV de-winterization.
Tires: Check every tire (including the spare) for proper inflation, visible cracking in the sidewalls, and tread depth. Do not assume they are holding pressure just because they look inflated.
Did You Know?
RV tires lose an average of 2 to 3 psi every month while in winter storage.
Source: Colton RV
An RV stored for five months could have lost 10 to 15 psi per tire, which is a serious safety issue. Always inflate to the manufacturer’s recommended pressure and do a full visual inspection before moving the vehicle.
Battery: Test your house batteries and chassis battery with a multimeter or load tester. Recharge fully and check electrolyte levels in flooded lead-acid batteries. If a battery no longer holds a charge, replace it before your first trip.
Engine and mechanical systems (motorhomes):
-
Check engine oil, coolant, brake fluid, and transmission fluid
-
Inspect belts and hoses for cracking or stiffness
-
Test all lights, turn signals, and brake lights
-
Start the engine and let it warm up fully before moving
Step 4: Interior Inspection, Appliances, and Safety Systems
The interior inspection during your spring RV de-winterization covers appliances, propane systems, and life-safety equipment. None of these steps are optional.
Propane system: Open the propane valve slowly and inspect all connections for leaks using soapy water. Test your stovetop, oven, and furnace. If anything smells off or does not ignite properly, stop and call a professional.
Appliances: Run the refrigerator in both propane and electric modes. Test the microwave, water heater, and air conditioning. Clean the furnace filter and check the exhaust vent for nesting insects or debris.
Safety devices:
-
Test smoke detectors and replace batteries
-
Test carbon monoxide detectors and replace if expired
-
Check LP gas leak detectors
-
Inspect the fire extinguisher for pressure and expiration
A thorough interior check should take at least two to three hours. If you rush this step and miss a propane leak or a failed CO detector, the consequences can be severe.
When to Visit an RV Repair Center After De-Winterization
Not every issue you find during your ‘Spring Awakening’ RV de-winterization is a DIY fix. Knowing when to bring your rig to a professional RV repair center is just as important as the inspection itself.
You should contact a professional rv repair center when you find:
-
Fiberglass cracks or delamination in wall or roof panels
-
Water damage or soft spots in floors, walls, or ceiling
-
Slide-out seal failures that caused moisture intrusion
-
Dents, scrapes, or paint damage from winter weather events
-
Structural frame concerns
-
Propane system issues that you cannot identify with basic tools
At Downtown Autobody, our 25,000 square foot facility is specifically built for RV body work and paint. Our technicians have extensive experience with all types of recreational vehicles, from small campers to full-size motor coaches.
We also coordinate directly with insurance companies, which is a significant advantage when winter storm damage results in an insurance claim. Do not try to manage the claims process alone when a team of professionals can handle it for you.
PDR and Paintless Dent Repair for Winter RV Damage
One of the questions we hear most often after the spring RV de-winterization inspection season is whether PDR is an option for RV dents. The answer depends on the type of panel, the depth of the dent, and whether the paint has cracked.
Paintless Dent Repair (PDR) uses specialized tools to massage dents back into shape from behind the panel, without the need for filler or repainting. For small to medium dents on metal or aluminum RV panels where the paint is still intact, PDR is an excellent option. It is faster, less expensive, and preserves the original factory finish.
However, PDR is not suitable for:
-
Fiberglass panels (which are common on most modern RVs)
-
Dents where the paint has cracked or chipped
-
Large or creased impact damage
-
Areas near panel edges or reinforced seams
When Paintless Dent Repair is not the right fit, our team moves to traditional body repair methods. This includes fiberglass repair, gel coat work, and our full paint matching system to deliver a seamless result. Our dedicated RV auto paint shop features an 80-foot enclosed heated paint booth, the only facility of its kind in Sonoma County.
PDR is also frequently used for trucks and tow vehicles that experience minor dings during winter. If your tow truck or pickup suffered door dings or minor panel dents, ask us about PDR options when you bring your RV in for de-winterization body work.
Auto Body Shop Services for Spring RV and Vehicle Readiness
Spring is peak season for our auto body shop services, and for good reason. Winter takes a toll on every vehicle, not just RVs. If your tow vehicle, daily driver, or truck sustained damage over the winter, address it at the same time you handle your RV de-winterization.
Our auto body shop handles a full range of services including:
-
Collision repair for vehicles damaged in winter accidents or fender-benders on icy roads
-
Frame straightening using advanced measurement systems to restore structural integrity
-
Fiberglass and plastic repair for bumpers, panels, and body components
-
Computerized color matching for a perfect paint blend
-
Welding and structural work for more serious damage
Collision repair is not something to put off. Structural damage that looks minor can compromise crumple zone performance in a future accident. If your vehicle was in a collision this winter, have it properly assessed and repaired before spring road trip season.
We also offer free loaner cars during repairs, so your life does not stop while we handle your vehicle. That applies whether you are in for RV body work, auto body shop collision repair, or a paint job.
Truck Collision Repair and Car Accident Repair After Winter
Winter driving is hard on every vehicle. For RV owners, the tow vehicle often takes as much punishment as the rig itself. Icy roads, tight campground maneuvering, and parking lot incidents all leave their mark.
Did You Know?
6% of RV-owning households are now full-time ‘long haulers,’ a four-fold increase from 1.5% in 2021, meaning more owners must manage vehicle systems year-round without traditional winter storage breaks.
Source: Statistical Surveys Inc. via RV Miles
If your truck or tow vehicle needs truck collision repair this spring, now is the time to handle it. Waiting until mid-summer when our shop is at peak capacity means longer wait times and more time without your vehicle.
We handle car accident repair for all makes and models, including full-size trucks and SUVs that are commonly used to tow fifth wheels and travel trailers. Our technicians are trained on modern frame measurement and structural alignment systems to ensure your truck is road-ready and safe to tow after any collision repair.
Truck collision repair on tow vehicles also involves checking the hitch receiver, trailer wiring harness, and brake controller connections as part of our post-repair process. We take the towing function seriously, not just the cosmetic result.
For car accident repair on smaller vehicles, our team uses the same high standards. Whether it is a minor rear-end bump from a winter parking lot incident or a more significant side impact, we assess the full scope of damage before starting any repair.
You can explore all of our repair services at the Downtown Autobody services page.
RV Paint Refresh as Part of Your Spring De-Winterization
Many RV owners discover during their ‘Spring Awakening’ RV de-winterization that their exterior paint has faded, oxidized, or sustained scratch damage over the winter. This is especially common on rigs stored outdoors or under trees.
Our RV auto paint shop is equipped to handle full exterior paint jobs, spot repairs, and gel coat restoration for all types of recreational vehicles. We use environmentally friendly waterborne paint systems with computerized color matching to produce a factory-quality finish.
Our 80-foot enclosed paint booth with a heated cross-draft system means we can complete large RV paint jobs quickly, with results that match or exceed the original factory finish. If your rig looks dull or faded after winter, a professional paint refresh can make it look new again before your first 2026 trip.
Combining paint work with body repair during the same service visit saves time and ensures a consistent color match across all repaired panels. We recommend combining your spring de-winterization body inspection with a paint assessment to plan any cosmetic work efficiently.
Building a Spring De-Winterization Checklist for 2026
A structured checklist removes the guesswork from the spring RV de-winterization process. Here is a condensed version you can use as a starting point:
| Category | Key Tasks | Professional Help Needed? |
|---|---|---|
| Exterior Body | Check seals, inspect panels, look for dents and cracks | Yes, for fiberglass, PDR, and paint work |
| Water System | Flush antifreeze, sanitize, check for leaks | Only for pipe or fitting failures |
| Tires | Inflate to spec, check tread and sidewalls | Replace if cracked or worn |
| Battery | Test, recharge, or replace | Replace if no longer holding charge |
| Propane and Appliances | Leak check, test all appliances | Yes, for any gas leak issues |
| Safety Devices | Test smoke, CO, and LP detectors | Replace expired units immediately |
| Engine (Motorhome) | Check fluids, belts, hoses, lights | For mechanical issues, yes |
Use this table as a foundation and add specific items based on your RV model and storage conditions. If you stored your rig outdoors in a region with heavy snow or ice, add extra time for the exterior body inspection step.
Conclusion
The ‘Spring Awakening’ RV de-winterization is not a single afternoon task. It is a comprehensive process that, when done properly, sets up a safe and enjoyable camping season for the rest of 2026.
From flushing your water system and testing your batteries to inspecting every inch of your exterior for dents, cracks, and paint damage, each step matters. When you find damage that goes beyond a simple DIY fix, the right move is to bring your rig to professionals who specialize in RV body work, collision repair, and paint services.
At Downtown Autobody, our RV repair specialist handles everything from fiberglass and gel coat repairs to full exterior paint refreshes in our dedicated 80-foot paint booth. We also offer full auto body shop services for your tow vehicle, including truck collision repair, car accident repair, and PDR (Paintless Dent Repair) for minor dents that do not require a full repaint.
Do not let winter damage slow down your first trip. Start your spring RV de-winterization early, work through the checklist systematically, and reach out to us for any repairs that require professional expertise. Your rig deserves to hit the road in the best possible condition.
Frequently Asked Questions
What is the ‘Spring Awakening’ RV de-winterization process in 2026?
The ‘Spring Awakening’ RV de-winterization process is a full recommissioning of your RV after winter storage. It covers flushing the water system, inspecting tires and batteries, checking all seals and exterior panels, testing appliances, and verifying safety devices are functional before your first spring trip.
How long does it take to de-winterize an RV?
A thorough spring RV de-winterization typically takes 4 to 8 hours for a full-size motorhome or fifth wheel. Smaller travel trailers may take 2 to 4 hours. If you discover body damage that requires professional repair, add time for a visit to an RV repair center.
Can I use PDR for dents found during my spring RV de-winterization?
PDR (Paintless Dent Repair) can be used on metal or aluminum RV panels where the paint is intact and the dent is not too deep or creased. It is not suitable for fiberglass panels, which are common on most modern RVs. A professional body shop can assess whether PDR is the right option for your specific damage.
Do I need an auto body shop after RV winter storage?
You need an auto body shop if your spring de-winterization inspection reveals dents, scratches, fiberglass cracks, paint oxidation, or panel delamination. These issues will not resolve on their own and can worsen if left unaddressed through the camping season.
What happens if I skip the spring RV de-winterization steps?
Skipping key de-winterization steps can result in antifreeze contamination in your water system, under-inflated tires that increase blowout risk, a dead battery that strands you at a campsite, or undetected propane leaks. The ‘Spring Awakening’ RV de-winterization checklist exists to prevent all of these scenarios.
Is truck collision repair necessary before a spring RV road trip?
Yes, if your tow truck or motorhome sustained collision damage over winter, truck collision repair should be completed before any spring trips. Structural damage in your tow vehicle can compromise its ability to safely haul a trailer and may affect crumple zone performance in a future accident.
Where can I get professional RV repair and auto body work in Sonoma County?
Downtown Autobody in Rohnert Park, CA, offers comprehensive RV repair and body work along with full auto body shop services including collision repair, Paintless Dent Repair, truck collision repair, and car accident repair. Our 25,000 square foot facility is one of the largest RV-focused body shops in Sonoma County.